 |
|
Count
|
|
| This option allows you to set the clip art count.
|
|
|
|
Width
|
|
| This option allows you to change the width as a percentage of the layout rectangle. For example, a value of 20 specifies that the width is 20 percent of the total width.
|
|
|
|
Height
|
|
| This option allows you to change the height as a percentage of the layout rectangle. For example, a value of 20 specifies that the height is 20 percent of the total height.
|
|
|
|
Angle
|
|
| This option allows you to change the rotation angle.
|
|
|
|
Color1
|
|
| Use this option to select a color, a gradient or texture brush. Open an image to create a texture brush.
|
|
|
|
Color2
|
|
| Use this option to select a color, a gradient or texture brush. Open an image to create a texture brush.
|
|
|
|
Background
|
|
| This option allows you to select a background color or background gradient.
|
|
|
|
Fill out
|
|
| Use this option to fill the entire selection.
|
|
|
|
Shift
|
|
| Use this option to apply an alternating (or staggered) pattern such that each shape is drawn in the middle of the two shapes in the row above it.
|
|
|
|
Alternating
|
|
| This option allows you to draw squares behind the shapes using alternating colors.
|
|
|
|
Closed Curve
|
|
| Draws a closed curve. A closed curve is a closed cardinal spline defined by the corner points of a shape.
|
|
|
|
Antialias
|
|
 | | 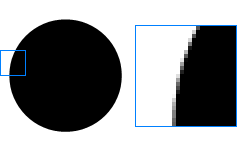 | | | Without antialias | With antialias |
|
|
| Use this option to draw smooth flowing lines by shading the pixels along the borders of graphical elements.
|
|
|
|
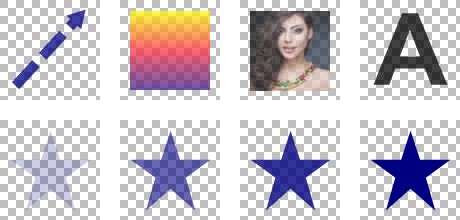
Opacity
|
|
|
 |
|
|
| This option allows you to set the opacity of the color, gradient, layer, or image you are working with. Opacity is the opposite of transparency. If something has an opacity value of 100%, that means it’s completely visible. An opacity value of 0% indicates that an object is completely transparent.
|
|
|
|
Outline
|
|
| This option allows you to draw an outline.
|
|
|
|
Line Width
|
|
| Use this option to set the line width in pixels.
|
|
|
|
Line Style
|
|
| Use the Line Style dialog to specify whether a line is solid or dashed, the dash sequence if it is dashed, the line width, the line alignment, the miter limit, and the styles of line joins and line caps.
|
|
|
|
Fill
|
|
| Use this option to fill the interior of the text or shape.
|
|
|
|
Round Join
|
|
 | |  | | | Miter | Round |
|
|
| This option allows you to choose between a round line join and a miter (sharp) line join.
|
|
|
|
Outline Tool
|
|
| Use this option to draw multiple outlines. Drag the Count slider to change the outline count. Click in the Color Picker control to change the outline colors. Drag the Size slider to change the outline size in pixels. Check 'AutoSize' to let the program automatically change the size of the outline. Check 'Round Edges' to draw round edges. Click the 'Advanced' button for advanced outline settings.
|
|
|
|
3D Effect
|
|
| This option allows you to create 3D looking text. Select the 3D color. Drag the Size slider to change the 3D size in pixels. From the dropdown list choose the 3D direction.
|
|
|
|
Shadow
|
|
| This option allows you to draw a shadow. Drag the X and Y sliders to specify the shadow's position in the X and Y direction. Select the shadow color. For a natural shadow set the color to Black (R=0, G=0, B=0) and the opacity to 20%.
|
|