 |
 | | Horizontal |
|
|
This option allows you to select the number of gridlines in the horizontal direction. The finer the grid, the tighter the adjustments you can make to the area of the image.
Min = 2, Max = 41, Default = 5.
|
|
|
| | Vertical |
|
|
This option allows you to select the number of gridlines in the vertical direction. The finer the grid, the tighter the adjustments you can make to the area of the image.
Min = 2, Max = 41, Default = 5.
|
|
|
 | | Transparent |
|
|
| This option allows you to make the background color transparent.
|
|
|
| | Horizontally symmetric |
|
|
| Use this option to create a horizontally symmetric distortion.
|
|
|
| | Vertically symmetric |
|
|
| This option allows you to create a vertically symmetric distortion.
|
|
|
 | | Show mesh |
|
|
| Use this option to show or hide the grid.
|
|
|
| | Move edge points freely |
|
|
|
 |
|
|
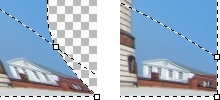
| Use this option to move the edge points freely (left image). Unchecking this option will constraint the movement to the raster edges only (right image).
|
|
|
| | Animate the distortion over time |
|
|
| Use this option to animate the distortion over time.
|
|
|
|
|
|
| This option allows you to change the background color.
|
|
|
|
Number of Frames
|
|
| This option allows you to specify the number of frames.
|
|
|
|
Delay
|
|
| This option allows you to specify a delay-the time that a frame is displayed-for single frames or for multiple frames in an animation. Delay time is displayed in seconds.
|
|